These are detailed instructions on how to create a Take 2 Patchstick to install SSH onto your AppleTV.
In order to perform this tutorial you need a usb stick that has been freshly formated in Mac OS Extended (Journaled) format.
[Update 2008-04-06] I have software updated my AppleTV to 2.0.1 then followed this tutorial again exactly. The Patchstick worked perfectly and now I have SSH installed on my 2.0.1 AppleTV. If you are having a problem following this tutorial it is most likely that your Tiger CD is incompatible. I used a 512MB Lexar usb stick.
Step One Connect your USB Stick to the computer.
Step Two Insert your OSX Tiger Install CD into the computer.
Step Three Download the Patchstick 2.0 prep files from here: Small USB Stick (
Once downloaded mount the updater by double clicking the downloaded dmg
Step Six Download the AppleTV 1.1 Updater from here
Once downloaded mount the updater by double clicking the downloaded dmg
Step Seven Open a new Terminal window by launching it from Applications:Utilities.
Step Eight Execute the following commands into the Terminal window:
cd ~/Desktop/Patchstick/Files
sudo sh script.sh If prompted for a password enter your Administrator password.
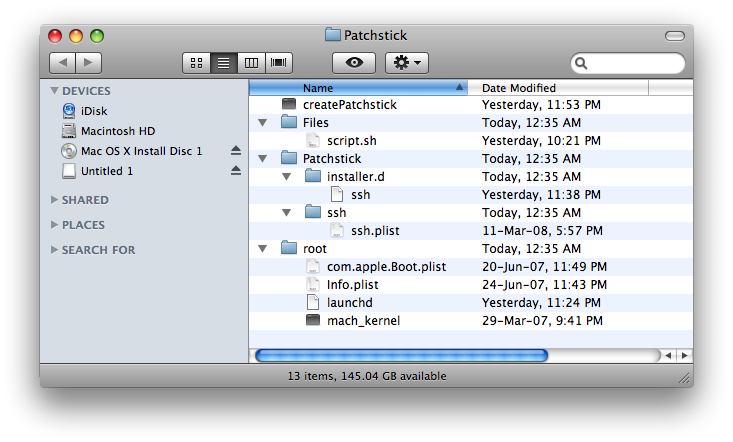
cd ~/Desktop/Patchstick
sudo ./createPatchstick. If prompted for a password enter your Administrator password.
Notice the last command listed the different disks present. You must figure out which disk is for your usb stick. Mine was /dev/disk2. Now enter sudo ./createPatchstick /dev/disk2. (Make sure to remember to replace /dev/disk2 with your usb stick location).
You will now be prompted to confirm the partitioning of your usb stick. Type yes then hit enter.
The script will partition your usb stick and copy over the necessary files. This will take about five minutes. When done you will be told that your disk is now unmounted and ready to patch your AppleTV!!!!
HOW TO USE IT: Insert the USB Stick into the back of the AppleTV. Press and hold the - and Menu buttons on your remote until the AppleTV reboots.
This is what you will see:
Once done, unplug your AppleTV, remove the USB Stick, and plug the AppleTV back in.
Add Comment
Would you like to be notified when someone replies or adds a new comment?
Yes (All Threads)
Yes (This Thread Only)
No
Notifications
Would you like to be notified when we post a new Apple news article or tutorial?
I have just tried to hack my AppleTV to run an external USB HD. Everything went fine, I enabled SSH and can even view the external HD when it is connected to the AppleTV. However I can not see the AppleTV within iTunes.
I am running 2.1 on my Apple TV and I used the 2.1 OS Boot file. Is there a 2.1 file for the Patchstick file?
Thanks in advance.
I have received the same error messages, beginning below this line:
ln: /Volumes/Patchstick-root/bin/sbin: File exists
Copying System Extentions...
cp: Files/System/Library/Extensions/IOACPIFamily.kext: No such file or directory
cp: Files/System/Library/Extensions/AudioIPCDriver.kext: No such file or directory
cp: cannot overwrite directory /Volumes/Patchstick-root/System/Library/Frameworks/IOKit.framework/Versions/Current with non-directory Files/System/Library/Frameworks/IOKit.framework/Versions/Current
cp: cannot overwrite directory /Volumes/Patchstick-root/System/Library/Frameworks/IOKit.framework/Resources with non-directory Files/System/Library/Frameworks/IOKit.framework/Resources
Copying System files...
Adding Kerberos...
cp: cannot overwrite directory /Volumes/Patchstick-root/System/Library/Frameworks/Kerberos.framework/Versions/Current with non-directory Files/System/Library/Frameworks/Kerberos.framework/Versions/Current
cp: cannot overwrite directory /Volumes/Patchstick-root/System/Library/Frameworks/Kerberos.framework/Resources with non-directory Files/System/Library/Frameworks/Kerberos.framework/Resources
Is there anything on this issue? Much appreciated! michaelnau
I have a 1.1 aTV which I have updated to the latest take two software. In step 6 above, should I d/l the 1.1 update anyway? If so, does anyone know where to get it? The link is no longer valid.
Hello
Im getting this message when doing the last step in greating an patchstick.
Copying System Extentions...
cp: Files/System/Library/Extensions/IOACPIFamily.kext: No such file or directory
cp: Files/System/Library/Extensions/AudioIPCDriver.kext: No such file or directory
Anyone having the ide what could be wrong??
Thanks for any help...
Help! I really need this going as my desktop hard-disk failed and I need to get my files out of the appleTV (it's my only hope - like Luke (but hmmm, Yoda also says there is another, I suppose that would be physical disassembly of the appleTV which I'm trying to avoid). Anyway, I followed all the instructions and it worked fine. Booting up into the patchstick also seemed to work (appleTV 2.1) and the terminal/messages shown is identical to the screenshot in this post. But rebooting appleTV I don't get any new menu items. Any help would be greatly appreciated.
RMK, I had the same problem...
I fixed after searching the awkwardtv forums (using google I searched for... File exists mkdir: /Volumes/Patchstick-root/stuff). There is a post there that suggests the following...
unmount the stick
then sudo rm -r /Volumes/Patchstick-root/
That fixed it for me.
I have created patchstick before using above instruction. But, now after 2.1 update I tried creating patchstick and its not working. I am getting some error in last stage when I am copying files to USB stick. It says stick created successfully, but appleTV does not see it.
I have tried erasing and formating USB stick and running .createpatchstick script again but I get same thing. Here is the last step output. what am I doing wrong ?
---------------------------------------------------------------------------------------------------
/dev/disk1
#: TYPE NAME SIZE IDENTIFIER
0: GUID_partition_scheme *989.5 Mi disk1
1: Apple_HFS Patchstick-root 80.0 Mi disk1s1
2: Apple_HFS Patchstick 909.5 Mi disk1s2
Patitions done.
Creating System folders...
mkdir: /Volumes/Patchstick-root/sbin: File exists
mkdir: /Volumes/Patchstick-root/etc: File exists
mkdir: /Volumes/Patchstick-root/dev: File exists
mkdir: /Volumes/Patchstick-root/OSBoot: File exists
mkdir: /Volumes/Patchstick-root/stuff: File exists
ln: /Volumes/Patchstick-root/bin/sbin: File exists
Copying System Extentions...
cp: cannot overwrite directory /Volumes/Patchstick-root/System/Library/Frameworks/IOKit.framework/Versions/Current with non-directory Files/System/Library/Frameworks/IOKit.framework/Versions/Current
cp: cannot overwrite directory /Volumes/Patchstick-root/System/Library/Frameworks/IOKit.framework/Resources with non-directory Files/System/Library/Frameworks/IOKit.framework/Resources
Copying System files...
Adding Kerberos...
cp: cannot overwrite directory /Volumes/Patchstick-root/System/Library/Frameworks/Kerberos.framework/Versions/Current with non-directory Files/System/Library/Frameworks/Kerberos.framework/Versions/Current
cp: cannot overwrite directory /Volumes/Patchstick-root/System/Library/Frameworks/Kerberos.framework/Resources with non-directory Files/System/Library/Frameworks/Kerberos.framework/Resources
Copying Patchstick files...
Changing Patchstick-root to Apple TV Mode...
Unmount of all volumes on disk1 was successful
/dev/disk1s1 removed
Unmount of all volumes on disk1 was successful
/dev/disk1s1 added
Unmount of all volumes on disk1 was successful
---------------------------------------------------------------------------------------------------
Just an interesting note I've discovered: I tried a 4GB Lexar USB stick, and it rebooted and did absolutely nothing. I'm now using a 2GB Toshiba, and it works fine. Hope that helps folks like Risky and myself who ran into this.
I setup NFS by putting a mount statement in /etc/rc.local. Lately that has stopped working though, so it's somewhat of a manual process. I recently upgraded my ATV to 2.1 (to use the iphone remote) but haven't re-patched it, and I'm on vacation for the next month. When I get back I'll post the necessary commands. That said, I would say go with samba rather than nfs (samba was my first choice but wasn't working as well back then). http://wiki.awkwardtv.org/wiki/Enable_SAMBA_server
@Dustin:
I have had same problem. you must delete the root directory manually before creating it again. this must be done in terminal.
i found this solution in a forum. patchstick was then created without error message. i did not try yet but it should work now.
cu
Hi,
i did everything like told, but nothing happened after reboot. only language selection.
during last part of patchstick creatin the terminal says "cannot copy, file exists" but the script tells a success.
what is wrong? apple tv 2.1 intel mac leopard.
thankx
bruno
I did a factory restore. then updated to 2.0.1. then applied the patchstick again. and it worked just fine.
I built my patchstick on a PPC using an intel version of tiger install disk mounted.
hmmm. I tried this on a PPC with all the correct intel versions. creating patchstick worked ok. booting the appletv worked ok. but on the appletv I now get a login screen (??). after a couple of minutes it reboots and I get the language setup. and then the whole process starts again. I'm just about to try factory restore. and then taking the disk out and going back to the old fashioned way.
so the question I have (I didn't see it answered above): can this only be dne on an intel-based mac? as long as the factory restore works, I'm happy to try it again.
thanks in advance

")
")
")
")
")
")
")
")
")
")
")
")
")


![Samsung Overtakes Apple as Top Smartphone Provider in Q1 2024 [Chart]](/images/news/93311/93311/93311-160.jpg "Samsung Overtakes Apple as Top Smartphone Provider in Q1 2024 [Chart]")


![New 15-inch M3 MacBook Air On Sale for $149.01 Off! [Lowest Price Ever]](/images/news/93314/93314/93314-160.jpg "New 15-inch M3 MacBook Air On Sale for $149.01 Off! [Lowest Price Ever]")
![Apple 96W USB-C Power Adapter On Sale for 49% Off [Deal]](/images/news/93302/93302/93302-160.jpg "Apple 96W USB-C Power Adapter On Sale for 49% Off [Deal]")

![AirPods Pro 2 With USB-C On Sale for $189! [Deal]](/images/news/92932/92932/92932-160.jpg "AirPods Pro 2 With USB-C On Sale for $189! [Deal]")
![iPad Mini 6 On Sale for Just $375! [Lowest Price Ever]](/images/news/93207/93207/93207-160.jpg "iPad Mini 6 On Sale for Just $375! [Lowest Price Ever]")
