These are instructions on how to install Windows 7 (32 bit or 64 bit) on your Mac using Boot Camp.
Before you begin this tutorial you will need the following:
- Windows 7 Installation DVD
- Mac OS X Installation DVD or Boot Camp 2.1 on CD/DVD
Step One
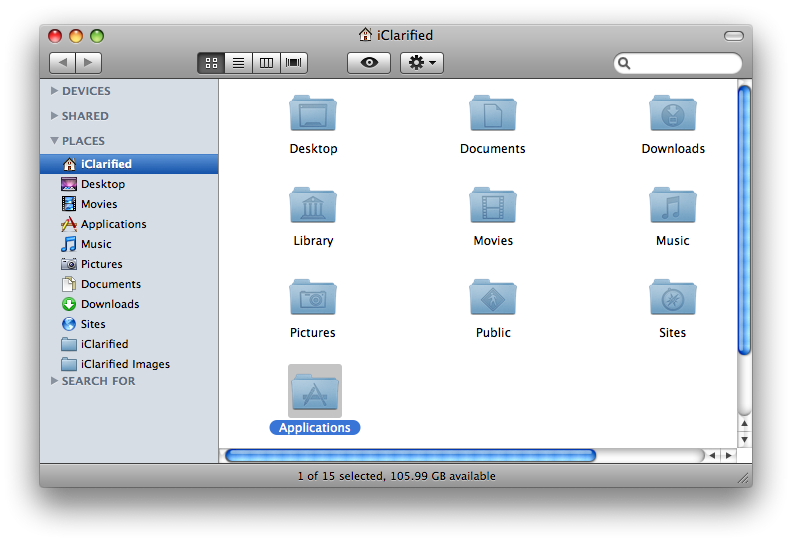
Open a new Finder window by clicking the Finder icon in your dock.


Step Two
Click Applications from the list of places on the left.


Step Three
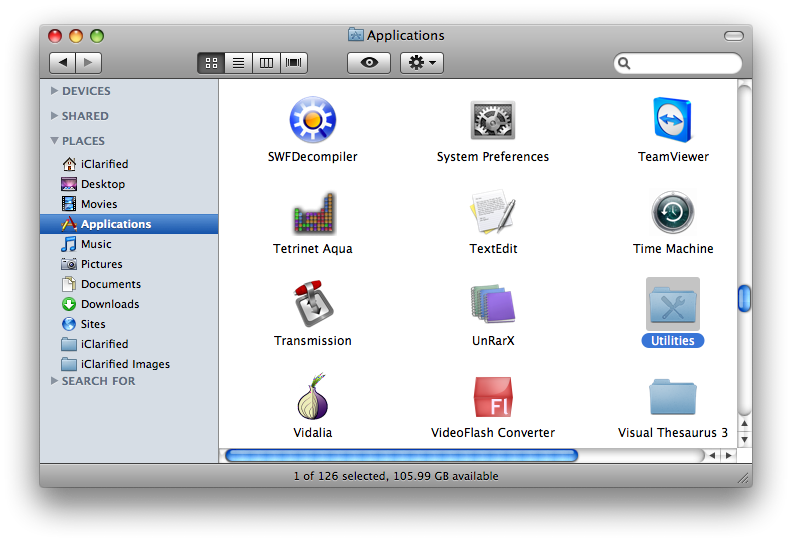
Double click the Utilities folder to access your utility applications.


Step Four
Double click the Boot Camp icon to launch the application.
Step Five
The Boot Camp Assistant will open. Click the Continue button.
Step Six
You will now be asked to Create a Partition for Windows. You can drag the divider to set the size of the partitions. Windows 7 needs about 10 GB at very minimum. If you plan to install applications make sure you allow extra space for them. I clicked the Use 32 GB button to assign 32 GB to my Windows 7 partition. When satisfied with the size of your partition click the Partition button.
Boot Camp will now partition your hard disk...
Step Seven
Once your disk has been partitioned you are ready to start the Windows installation. Insert your Windows 7 Installation DVD and click the Start Installation button.
Step Eight
Your computer will now reboot and launch the Windows 7 Setup. Select your language, Time and currency format, and Keyboard or input method from the dropdown boxes, then click the Next button.
Step Nine
Click the Install now button.
Step Ten
Please read the license terms then check the box to accept the license terms. Click the Next button to continue.
Step Eleven
Click to select the Custom (advanced) method of installation.
Step Twelve
Click to select the Disk Partition labeled BOOTCAMP then click the Drive options (advanced) link below.
A few different drive options will appear. Making sure the BOOTCAMP partition is highlighted click the Format link.
A popup window will appear warning you that any data stored on the partition will be lost. Click the OK button.
Once the drive has finished formatting you can click the Next button to continue.
Step Thirteen
Windows 7 will now begin copying and expanding files. This may take some time. After all the files have been copied and expanded your computer will reboot.
Windows 7 will now complete the installation.
Your computer will then be restarted again.
Step Fourteen
You will then be asked to choose a username for your account and name your computer to distinguish it on the network. Please do this then click the Next button to continue.
Step Fifteen
You will then be asked to set a password to use when you log on to your computer. Type in your desired password, retype it to confirm, and enter a hint to be used if you forget the password. Click the Next button to continue.
Step Sixteen
Windows 7 Setup will now ask for your product key. Input the key then click the Next button to continue.
Step Eighteen
Windows will now ask you to select your preference in regards to its updates, security, and online assistance. Select Use recommended settings unless you are an advanced user and understand how to manage the system on your own.
Step Nineteen
Review your time and date settings to make sure they are correct, then click the Next button to continue.
Step Twenty
You will be asked to join a wireless network. Select your wireless network from the list that appears then click theNext button. If you do not wish to set up a wireless network you may click the Skip button.
Step Twenty One
Windows 7 Setup will ask you to select your computer's current location. Click the appropriate option.
Step Twenty Two
Since I select Home in the previous step, Windows asks if I would like to create a homegroup. A homegroup links computers on your home network so that you can share devices and files. Click the Next button if you would like to create a homegroup; otherwise, click the Skip button.
Step Twenty Three
Windows 7 will now open to the Desktop.
Click on the Windows button at the bottom left then click Computer. Select your DVD drive from the visible devices then click the Eject button in the toolbar.
Step Twenty Four
Insert your Mac OS X Installation DVD and run the setup.exe file.
Note*: If you have installed the 64 bit version of Windows 7 then insert and run a DVD that contains BootCamp 2.1 for Windows Vista 64 bit (BCUpdateVista64.exe).
Step Twenty Five
The Boot Camp Installer will appear to guide you through the steps necessary to install Boot Camp. Click the Next button to get started.
Step Twenty Six
Read the license agreement, select I accept the terms in the license agreement, then click the Next button to continue.
Step Twenty Seven
Choose whether you would like to install Apple Software Update for Windows then click the Install button.
Step Twenty Eight
Boot Camp will proceed to install the drivers necessary for your Mac to work properly with Windows.
When the installation has completed click the Finish button.
You will then be prompted to restart your system for the configuration changes to take effect. Click the Yes button.
Step Twenty Nine
Once your system has restarted you will have successfully installed Windows 7 on your Mac using Boot Camp.
Notice that now your screen resolution will have improved and you should have all your drivers working properly!
NOTES*: We installed Windows 7 on a late 2008 MacBook Pro. We had no difficulties with drivers of any sort. If there are any specific models of Macs that do need additional drivers please let us know in the comments and we will update the notes to contain links to these drivers. Thanks.
Before you begin this tutorial you will need the following:
- Windows 7 Installation DVD
- Mac OS X Installation DVD or Boot Camp 2.1 on CD/DVD
Step One
Open a new Finder window by clicking the Finder icon in your dock.


Step Two
Click Applications from the list of places on the left.


Step Three
Double click the Utilities folder to access your utility applications.


Step Four
Double click the Boot Camp icon to launch the application.
Step Five
The Boot Camp Assistant will open. Click the Continue button.
Step Six
You will now be asked to Create a Partition for Windows. You can drag the divider to set the size of the partitions. Windows 7 needs about 10 GB at very minimum. If you plan to install applications make sure you allow extra space for them. I clicked the Use 32 GB button to assign 32 GB to my Windows 7 partition. When satisfied with the size of your partition click the Partition button.
Boot Camp will now partition your hard disk...
Step Seven
Once your disk has been partitioned you are ready to start the Windows installation. Insert your Windows 7 Installation DVD and click the Start Installation button.
Step Eight
Your computer will now reboot and launch the Windows 7 Setup. Select your language, Time and currency format, and Keyboard or input method from the dropdown boxes, then click the Next button.
Step Nine
Click the Install now button.
Step Ten
Please read the license terms then check the box to accept the license terms. Click the Next button to continue.
Step Eleven
Click to select the Custom (advanced) method of installation.
Step Twelve
Click to select the Disk Partition labeled BOOTCAMP then click the Drive options (advanced) link below.
A few different drive options will appear. Making sure the BOOTCAMP partition is highlighted click the Format link.
A popup window will appear warning you that any data stored on the partition will be lost. Click the OK button.
Once the drive has finished formatting you can click the Next button to continue.
Step Thirteen
Windows 7 will now begin copying and expanding files. This may take some time. After all the files have been copied and expanded your computer will reboot.
Windows 7 will now complete the installation.
Your computer will then be restarted again.
Step Fourteen
You will then be asked to choose a username for your account and name your computer to distinguish it on the network. Please do this then click the Next button to continue.
Step Fifteen
You will then be asked to set a password to use when you log on to your computer. Type in your desired password, retype it to confirm, and enter a hint to be used if you forget the password. Click the Next button to continue.
Step Sixteen
Windows 7 Setup will now ask for your product key. Input the key then click the Next button to continue.
Step Eighteen
Windows will now ask you to select your preference in regards to its updates, security, and online assistance. Select Use recommended settings unless you are an advanced user and understand how to manage the system on your own.
Step Nineteen
Review your time and date settings to make sure they are correct, then click the Next button to continue.
Step Twenty
You will be asked to join a wireless network. Select your wireless network from the list that appears then click theNext button. If you do not wish to set up a wireless network you may click the Skip button.
Step Twenty One
Windows 7 Setup will ask you to select your computer's current location. Click the appropriate option.
Step Twenty Two
Since I select Home in the previous step, Windows asks if I would like to create a homegroup. A homegroup links computers on your home network so that you can share devices and files. Click the Next button if you would like to create a homegroup; otherwise, click the Skip button.
Step Twenty Three
Windows 7 will now open to the Desktop.
Click on the Windows button at the bottom left then click Computer. Select your DVD drive from the visible devices then click the Eject button in the toolbar.
Step Twenty Four
Insert your Mac OS X Installation DVD and run the setup.exe file.
Note*: If you have installed the 64 bit version of Windows 7 then insert and run a DVD that contains BootCamp 2.1 for Windows Vista 64 bit (BCUpdateVista64.exe).
Step Twenty Five
The Boot Camp Installer will appear to guide you through the steps necessary to install Boot Camp. Click the Next button to get started.
Step Twenty Six
Read the license agreement, select I accept the terms in the license agreement, then click the Next button to continue.
Step Twenty Seven
Choose whether you would like to install Apple Software Update for Windows then click the Install button.
Step Twenty Eight
Boot Camp will proceed to install the drivers necessary for your Mac to work properly with Windows.
When the installation has completed click the Finish button.
You will then be prompted to restart your system for the configuration changes to take effect. Click the Yes button.
Step Twenty Nine
Once your system has restarted you will have successfully installed Windows 7 on your Mac using Boot Camp.
Notice that now your screen resolution will have improved and you should have all your drivers working properly!
NOTES*: We installed Windows 7 on a late 2008 MacBook Pro. We had no difficulties with drivers of any sort. If there are any specific models of Macs that do need additional drivers please let us know in the comments and we will update the notes to contain links to these drivers. Thanks.
