Comment Jailbreaker votre iPhone en utilisant Absinthe 2.0 (Windows) [5.1.1]
LIKE
TWEET
SHARE
PIN
SHARE
POST
MAIL
MORE
Posted May 28, 2012 at 1:54am by iClarified
Voici les instructions pour réaliser le jailbreak libre (untethered) de votre iPhone sur iOS 5.1.1 en utilisant Absinthe pour Windows.
Attention*** : Avant de poursuivre, assurez-vous d'avoir sauvegarder votre appareil dans iTunes car vous pourriez perdre votre dossier "Pellicule Photo" durant le processus.
Etape 1 Téléchargez la dernière version d'Absinthe ici.
Etape 2 Extraire l'archive téléchargée.
Etape 3 Ouvrez le dossier issu de l'extraction. Double cliquez sur le fichier absinthe-win-2.0.exe.
Cette action va créer un nouveau dossier appelé absinthe-win-2.0.
Ouvrez ce dossier nouvellement créé et exécutez le fichier absinthe.exe.
Etape 3 Quand cela est demandé, branchez votre iPhone à l'ordinateur via USB. Assurez-vous d'avoir effacé les mots de passe ou configurations VPN existantes.
Etape 4 Cliquez sur le bouton Jailbreak pour commencer.
Etape 5 Cette application va vous faire passer par plusieurs étapes pour finaliser le jailbreak : début du jailbreak, envoi des données initiales du jailbreak, envoi des données finales du jailbreak, attente du reboot, attente finale jusqu'à ce que le processus soit complet.
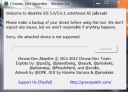
Etape 6 Vous serez informez que le jailbreak est 'Done Enjoy !' (fait, profitez-en !)
Etape 7 Quelques moments après vous verrez apparaître une icone Cydia sur votre Springboard !
***En cas de problème, renouvelez cette procédure sur un appareil nouvellement restauré avec iOS 5.1.1 (Bien sûr vous aurez sauvegardé cet appareil avant même de commencer tout jailbreak !!)***
Add Comment
Would you like to be notified when someone replies or adds a new comment?
Yes (All Threads)
Yes (This Thread Only)
No
Notifications
Would you like to be notified when we post a new Apple news article or tutorial?
I have an iPhone 4 factory unlocked (can work with any sim card or phone company that I want).
I think it originally came with iOS 4.3.3 and I already updated the iOS and jailbreak many times.
Nowadays I have it with iOS 5.0.1 already jailbroken..
I'd really like to update to iOS 5.1.1 and jailbreak it.
My question:
If this iOS update and unthetered jailbreak to 5.1.1 still possible at the moment?
or I will end up with a "blocked" iphone, because of the erros in the process, with no other choice that updating to iOS 6.0.1 (current official) with no jailbreak at all.
Hope it understands what I'm asking..
Please, someone answer.. Thanks!
I have a 4S with 5.1.1, but the latest IOS available is 6.0.1. I did not update the IOS version, and followed the steps mentioned. I get an error "Unable to connect to lockdownd. aborting." But the Cydia icon appears on the iphone. did it install correctly? To remove Cydia, I tried to restore from backup, but it still had the Cydia installed.
Anything Im doing wrong? I dont want to restore to 6.0.1
Thanks
I am not able to understand where u r exactly getting this error, I assume u have installed the jailbroken ios 5.1.1 then what happend did u iphone is in working state or not...? please elaborate the issue properly...
all download links are here on iclarified just pick the jailbreak for you (Absynthe) which is the best and go to turorial for your device look for absynthe jailbreak, click on it and it will run you through how to do it with a link to absynthe aswell, one will be for ios and one will be for windows remeber to pick the right one
so im trying to unlock my 4s and ive down loaded and extracted them but when im supposed to plug my phone in it doesnt even see thats its there how do i fix this. my desktop knows my phone is plugged in but absinthe does not wtf
Hi Folks,
My visually impaired friend from Venezuela bought an old iPhone 3GS believing that it is not locked and tried to upgrade to 5.1.1 (without asking me, and yes, I am in Europe, so can only do remote support). She upgraded to 5.1.1 in iTunes and of course the SIM is not recognized.
Yesterday I guided her installing the latest version of Absinthe on her PC. The app starts, and when she plugged the USB cable it recognized the iPhone and its hardware version, but the "Jailbreak" button stays disabled. What should she do?
Although I am an iPhone dev, I never before considered jailbreaking any device, so please do not give me a hard time :)
I really will appreciate your help, because for my friend the iPhone (and the VoiceOver) opened a new world of possibilities. Thanks again!
![Comment Jailbreaker votre iPhone en utilisant Absinthe 2.0 (Windows) [5.1.1]](/images/tutorials/22184/81053/81053-64.png "Comment Jailbreaker votre iPhone en utilisant Absinthe 2.0 (Windows) [5.1.1]")


")


![Comment Jailbreaker votre iPhone en utilisant Absinthe 2.0 (Windows) [5.1.1]](/images/tutorials/22184/81063/81063.png "Comment Jailbreaker votre iPhone en utilisant Absinthe 2.0 (Windows) [5.1.1]")
![Comment Jailbreaker votre iPhone en utilisant Absinthe 2.0 (Windows) [5.1.1]](/images/tutorials/22184/81064/81064-500.png "Comment Jailbreaker votre iPhone en utilisant Absinthe 2.0 (Windows) [5.1.1]")
![Comment Jailbreaker votre iPhone en utilisant Absinthe 2.0 (Windows) [5.1.1]](/images/tutorials/22184/81066/81066-500.png "Comment Jailbreaker votre iPhone en utilisant Absinthe 2.0 (Windows) [5.1.1]")
![Comment Jailbreaker votre iPhone en utilisant Absinthe 2.0 (Windows) [5.1.1]](/images/tutorials/22184/81068/81068-500.png "Comment Jailbreaker votre iPhone en utilisant Absinthe 2.0 (Windows) [5.1.1]")
![Comment Jailbreaker votre iPhone en utilisant Absinthe 2.0 (Windows) [5.1.1]](/images/tutorials/22184/81077/81077-500.png "Comment Jailbreaker votre iPhone en utilisant Absinthe 2.0 (Windows) [5.1.1]")
![Comment Jailbreaker votre iPhone en utilisant Absinthe 2.0 (Windows) [5.1.1]](/images/tutorials/22184/81069/81069-500.png "Comment Jailbreaker votre iPhone en utilisant Absinthe 2.0 (Windows) [5.1.1]")
![Comment Jailbreaker votre iPhone en utilisant Absinthe 2.0 (Windows) [5.1.1]](/images/tutorials/22184/81070/81070-500.png "Comment Jailbreaker votre iPhone en utilisant Absinthe 2.0 (Windows) [5.1.1]")
![Comment Jailbreaker votre iPhone en utilisant Absinthe 2.0 (Windows) [5.1.1]](/images/tutorials/22184/81072/81072-500.png "Comment Jailbreaker votre iPhone en utilisant Absinthe 2.0 (Windows) [5.1.1]")
![Comment Jailbreaker votre iPhone en utilisant Absinthe 2.0 (Windows) [5.1.1]](/images/tutorials/22184/81073/81073-500.png "Comment Jailbreaker votre iPhone en utilisant Absinthe 2.0 (Windows) [5.1.1]")
![Comment Jailbreaker votre iPhone en utilisant Absinthe 2.0 (Windows) [5.1.1]](/images/tutorials/22184/81074/81074-500.png "Comment Jailbreaker votre iPhone en utilisant Absinthe 2.0 (Windows) [5.1.1]")
![Comment Jailbreaker votre iPhone en utilisant Absinthe 2.0 (Windows) [5.1.1]](/images/tutorials/22184/81079/81079-500.png "Comment Jailbreaker votre iPhone en utilisant Absinthe 2.0 (Windows) [5.1.1]")
![Comment Jailbreaker votre iPhone en utilisant Absinthe 2.0 (Windows) [5.1.1]](/images/tutorials/22184/81078/81078-500.png "Comment Jailbreaker votre iPhone en utilisant Absinthe 2.0 (Windows) [5.1.1]")


![Apple Seeds tvOS 26.2 Release Candidate 2 to Developers [Download]](/images/news/99251/99251/99251-160.jpg "Apple Seeds tvOS 26.2 Release Candidate 2 to Developers [Download]")
![Alan Dye's Departure Viewed as 'Best Personnel News at Apple in Decades' [Report]](/images/news/99247/99247/99247-160.jpg "Alan Dye's Departure Viewed as 'Best Personnel News at Apple in Decades' [Report]")
![Apple Shares Trailer for 'Tehran' Season 3, Announces Season 4 Renewal [Video]](/images/news/99244/99244/99244-160.jpg "Apple Shares Trailer for 'Tehran' Season 3, Announces Season 4 Renewal [Video]")


![Final Cyber Monday Deals: M4 MacBook Air for $749, Beats, Sonos, and More [List]](/images/news/99203/99203/99203-160.jpg "Final Cyber Monday Deals: M4 MacBook Air for $749, Beats, Sonos, and More [List]")
![iPad mini 7 Falls to New All-Time Low of $349 [Cyber Monday 2025]](/images/news/99197/99197/99197-160.jpg "iPad mini 7 Falls to New All-Time Low of $349 [Cyber Monday 2025]")
![Apple Watch Series 11 Drops to New All-Time Low Price of $329 [Cyber Monday 2025]](/images/news/99195/99195/99195-160.jpg "Apple Watch Series 11 Drops to New All-Time Low Price of $329 [Cyber Monday 2025]")

![Apple Watch Ultra 3 Drops to New All-Time Low of $679 [Deal]](/images/news/99189/99189/99189-160.jpg "Apple Watch Ultra 3 Drops to New All-Time Low of $679 [Deal]")
